This post covers the steps required to get an Archlinux virtual machine up in Azure.

Azure documentation has a guide for Create and upload generic linux image. We will expand on it and go into archlinux specific details here :)
Pre-requisites
We will use qemu through out this article to run a VM locally and configure it. Let’s install it right away.
# pacman -S qemuOur strategy is to locally create a virtual machine with all requisites for azure. Then we will convert the VM hard disk to a VHD suitable for azure. Finally, we will publish the vhd to cloud, and create a VM in azure from that!
Get a virtual machine
We will assume you already have a stock virtual machine image. You can get the archlinux iso and prepare a VM with qemu, or download a archlinux image1.
Start the image in qemu.
$ qemu-system-x86_64 archlinux.qcow2All the following commands will run in the VM we just started.
Prepare the VM
Let’s tweak the image for azure readiness.
Add hyper-v modules to startup
Azure requires the hyper-v modules to be preloaded during boot time. We will create a new initramfs with them.
# vim /etc/mkinitcpio.conf

Modify the MODULES array in the file
MODULES="hv_storvsc hv_vmbus"
Now generate the default initramfs image.
# mkinitcpio -p linuxValidate the generated image has required modules.
# lsinitcpio /boot/initramfs-linux.img | grep hv_

Output should be similar to:
usr/lib/modules/4.7.0-1-ARCH/kernel/hv_storvsc.ko
usr/lib/modules/4.7.0-1-ARCH/kernel/hv_vmbus.ko
Install WALinuxAgent and configure it
WALinuxAgent, as the name suggests, configures the VM to be azure compliant. It keeps azure notified of key changes like hostname etc., provisions a resource disk and so on.
If you’ve not setup yaourt or a similar aur package manager,
please do so. Install the azure linux agent from
AUR.
$ yaourt -S walinuxagentThis package installs the waagent systemd service in the VM for monitoring.
We will enable the service at boot.
# systemctl enable waagentModify /etc/waagent.conf with following values.
Provisioning.DeleteRootPassword=n
Logs.Verbose=y
AutoUpdate.Enabled=n
Note that the options are primarily geared to help us debug failures. Later we
can configure ssh to not allow root to login. We’ve disabled autoupdate to
ensure VM doesn’t break without our knowledge, the demerit is we will not get
any fixes (incl. critical ones) automatically. We can turn this on later as
well.
A few additional checks before we deprovision the virtual machine.
Ensure dhcpcd service is enabled to run at startup. Without it, we will just lock the VM out in the cloud :)
# systemctl enable dhcpcdEnsure ssh daemon is set to run at startup. You may want to pre-provision an
user in the VM; just in case. Modify /etc/ssh/sshd.config appropriately.
# systemctl enable sshdWe’re now ready to deprovision the virtual machine.
# waagent -force -deprovision
# export HISTSIZE=0
# shutdown -h now
Virtual disk on the cloud
Now back to the local box which hosts the virtual machine.
Azure requires the VHD to be a fixed disk with size rounded to the nearest MB. The azure guide provides clear instructions for this. We’ll convert our disk to a raw image first.
$ qemu-img convert -f qcow2 -O raw archlinux.qcow2 archlinux.rawSave the following script as resize.sh in local directory.
# Prints the size of raw and vhd disk
rawdisk="archlinux.raw"
vhddisk="archlinux.vhd"

echo "RAW Info:"
MB=$((1024*1024))
size=$(qemu-img info -f raw --output json "$rawdisk" | \
       gawk 'match($0, /"virtual-size": ([0-9]+),/, val) {print val[1]}')

echo "Current Size = $size"
rounded_size=$((($size/$MB + 1)*$MB))
echo "Rounded Size = $rounded_size"

echo "VHD Info:"
size=$(qemu-img info -f raw --output json "$vhddisk" | \
       gawk 'match($0, /"virtual-size": ([0-9]+),/, val) {print val[1]}')

echo "Current Size = $size"
rounded_size=$((($size/$MB + 1)*$MB))
echo "Rounded Size = $rounded_size"
On running ./resize.sh you will get the rounded size of the raw image. Resize
it first to that value.
# # rounded_size is got by running ./resize.sh
$ qemu-img resize archlinux.raw <rounded_size>
Now convert the raw image to vhd.
$ qemu-img convert -f raw -o subformat=fixed,force_size -O vpc archlinux.raw archlinux.vhd
$ ./resize.sh
Validate that the Rounded size for raw and vhd are the same.
Upload the vhd to azure
Install azure-vhd-utils-for-go-git from AUR.
$ yaourt -S azure-vhd-utils-for-go-git Following command will upload the vhd and create a VM image in Azure.
$ vhd upload --localvhdpath archlinux.vhd --stgaccountname archtest --stgaccountkey storagekey --blobname archlinux.1Note that the archtest storage account is a classic storage account.
Create VM in azure
Navigate to the older azure portal https://manage.windowsazure.com.
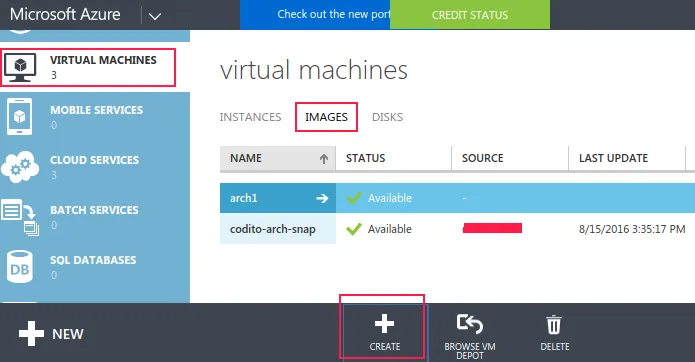
Create a Image for the vhd:
- Navigate to Virtual Machines in the left side pane
- Open the Images tab in right side
- Use Create from the toolbar below

Point the image to vhd uploaded previously.
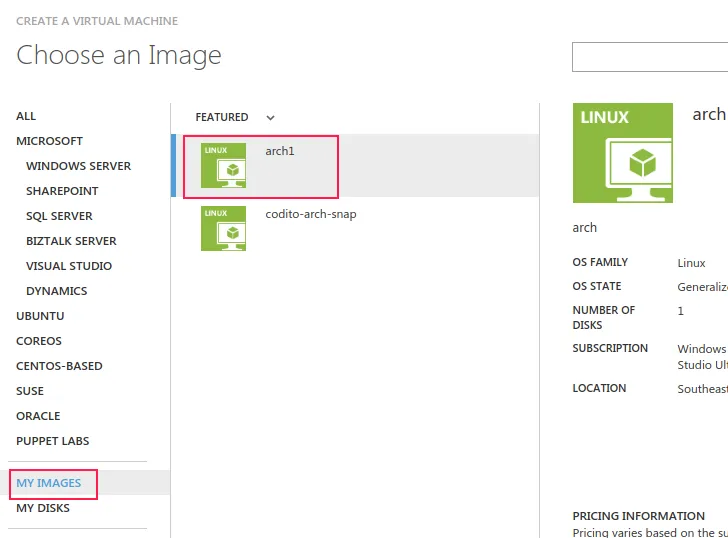
For creating a VM with a custom image, use the Images option in Create VM dialog. There’s a windows VM guide here, the steps are similar for our custom vhd.

That’s all for now. If all went well, you should be able to ssh into the VM just created :)
Footnotes
-
You can get one from tuxfixer. Here’s the direct link to qcow2 file. ↩